Want to know how to make a squishy without a trip to a craft shop? Here is the method, the kit list and the mistakes that ruin a first batch.
By Hannah Doyle · · 9 min read
Learning how to make a squishy is mostly about two choices: what goes inside and what goes outside. Get those right and the rest is cutting, stuffing and sealing.
This guide covers a soft foam squishy (the easiest to do well) and a paper squishy (the easiest to do on a tight budget). We also flag what not to do, because a few things online are plainly daft.
How to make a squishy: pick your method first
There are three routes people take. They differ in mess, time and how much the result feels like a shop-bought squishy. Choosing before you start saves a lot of wasted material.
Three ways to make a squishy at home
Method
Skill level
Time
Feel
Mess
Sponge or foam squishy
Beginner
30 to 45 minutes
Soft, springy, quick rebound
Low
Paper squishy
Beginner
20 to 30 minutes
Flat, tapey, light squish
Low
Fabric-and-wadding squishy
Intermediate
1 to 2 hours
Plush, slow to flatten
Medium
Which one suits you?
Short on time or doing this with a group: go for a sponge squishy.
Fancy something flat to stick on a notebook: try a paper version. We cover the basics in our paper squishy guide.
Want something to hold during a long film: fabric and wadding wins.
We stick to the sponge method below, because it gives the most reliable result for a first attempt.
What you need to make a squishy: the materials checklist
You can assemble most of this from a drawer and a corner shop. A ready-made squishy kit saves hunting around, but it is not essential.
A new kitchen sponge or a sheet of craft foam (thick, soft, no scouring side)
Sharp craft scissors
Permanent marker for drawing the shape
Fabric glue or a clear flexible craft glue
Acrylic paint or fabric pens for the face and details
A thin layer of clear sealant or matt varnish (optional)
A ruler and a sheet of scrap paper for your template
Use new materials only. Never reuse a sponge that has cleaned a worktop, and keep hands and tools clean while you work.
Quick pre-flight checklist
Clear a flat table and put down a bin bag or newspaper.
Draw your shape on paper first and cut it out.
Test your glue on a spare scrap of sponge.
Check the foam springs back when pressed. If it stays dented, swap it.
Step-by-step: how to make a squishy from sponge
Keep the first design simple. A bun, a blob or a cloud works well, and you can get fancy once you have the hang of it.
The method
Draw a simple shape on paper, around the size of your palm, and cut it out as a template.
Trace the template twice onto the sponge with a marker.
Cut both pieces with sharp scissors, using long smooth cuts rather than short snips.
Round off the edges by trimming tiny slivers, so the shape looks soft rather than boxy.
Paint your design on one side. Thin coats dry faster and stay flexible.
Let the paint dry fully, about an hour for thin coats.
Add a small face with a fabric pen or dots of paint.
If you want a thicker squishy, glue the two pieces together with a thin line of glue around the edge only.
Press lightly under a book for a few minutes, then leave it to cure overnight.
Why thin coats matter
Thick paint dries stiff and cracks when you squeeze. Two thin coats stay bendy, and the squishy keeps its give for much longer.
Do not use a heat gun, hairdryer on hot, oven or microwave to speed up drying. Authorities in several countries have warned against heating squishies. Air-dry everything.
Make it feel right: texture and rebound tweaks
Shop-bought squishies often have a slow rebound. Homemade ones usually spring back quickly, which is fine, but you can nudge the feel.
Small changes, big difference in feel
Change
Effect
Watch out for
Thicker foam sheet
Chunkier, slower to flatten
Harder to cut cleanly
Two layers glued edge only
Softer centre, defined edges
Too much glue stiffens it
Skip varnish
Stays soft and matt
Paint may rub off with heavy use
Rounded corners
Looks and feels cuter
Cut off a little at a time
What the shop-bought ones do
For comparison, we tested the MushyKinz Jelleez, which is annoncé as a firm maltose squish with a slow rebound. It makes a handy benchmark if you want to match a slow, dense feel at home.
You will not copy it exactly with sponge. Think of it as a target for how it should feel, not a recipe.
Mistakes that ruin a first squishy
Most failures come from the same few slips. Spot them early and you avoid redoing the whole thing.
Using a sponge with a scouring layer, which feels scratchy and sheds bits.
Painting too thickly, so the surface cracks the first time you squeeze.
Over-gluing the whole surface, which turns the middle into a hard slab.
Cutting with blunt scissors, leaving ragged edges that fray.
Rushing the drying time, so colours smudge on your hands.
Mistakes to avoid on safety
Heating, microwaving or warming a squishy to change its texture. Never do this.
Filling a homemade squishy with liquid, gel, beads or sand. Keep it solid foam.
Handing a homemade squishy with small stuck-on parts to a very young child.
On the heating point: France's consumer authority, the DGCCRF, asked people on 10 August 2026 not to copy social media experiments such as microwaving squishies. It cited reports of burst toys and burns.
Safety notes for making and using squishies in the UK
A homemade foam squishy is a craft project, not a toy product, so it has no CE or UKCA marking. Treat it as a desk item for older kids and adults, and keep it away from babies and toddlers.
What the authorities have said
The UK's Office for Product Safety and Standards (OPSS) published a safety report on 10 August 2026 about a liquid-filled squishy dumpling toy. According to the report, the liquid had microbiological contamination above the permitted limit.
The product had no identification details and no UKCA or CE marking, and the shipment was refused at the border.
Check the packaging of shop-bought squishies for a UKCA or CE mark and a maker or importer address.
Follow the age guidance printed on the pack.
Stop using a squishy that has cracked or is leaking.
Report problems to Trading Standards.
For a wider picture, read our guides on whether squishies are safe and squishy recalls. Always follow the maker's notice.
Examples and materials worth a look
If you would rather handle a few finished squishies before you design your own, they make decent reference points for shape, size and texture. We included four below.
Dense and chunky: the MushyKinz Jelleez is annoncé at 7.8 cm long and 6.5 cm tall, a handy palm size to copy.
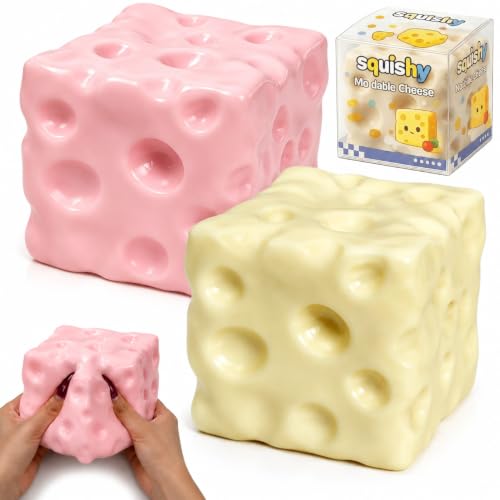
Flat and mouldable: the cheese pair is annoncé as a soft, non-rebound, shapeable squishy.
Cube shape: the ZQuintuplian cubes show how a simple geometric form can still look fun.
Novelty form: the Mondiko poo ball is annoncé as soft PU foam, a useful look at a quirky character shape.
Want a full reading of any of them? Our MushyKinz review and ZQuintuplian review go into more detail. If you only want to browse, popular squishies is a good place to start.
Care and storage for your homemade squishy
A handmade squishy needs gentle treatment. Keep it dry and out of direct sun, and it will last for weeks of regular squeezing.
Wipe with a dry or very slightly damp cloth. Avoid soaking foam, as it holds water.
Store it flat in a box or drawer, away from radiators and sunny windowsills.
Check for cracks and shedding every so often.
Bin it when the paint flakes off or the foam crumbles.
Yes. A new sponge or craft foam, scissors, glue and paint are enough for a basic squishy. A kit saves time, but it is not needed for a first project.
How long does it take to make a squishy?
A simple sponge squishy takes around 30 to 45 minutes of hands-on time. Add an hour or so for paint to dry, plus overnight curing if you glued two layers together.
Is it safe to make a squishy at home?
A solid foam squishy is a low-fuss craft, but keep it away from very young children and never heat it. Authorities in several European countries have warned about shop-bought liquid and gel squishies, so avoid filling yours with anything. See our safety guide for more.
Can I microwave a squishy to make it softer?
No. The DGCCRF in France asked people on 10 August 2026 not to copy videos of squishies being microwaved, and cited reports of burst toys and burns. Air-dry and leave it alone.
Why does my homemade squishy feel stiff?
Usually it is thick paint or too much glue. Use thin coats, glue only the edges, and skip heavy varnish. A thicker foam sheet also helps the rebound.
Can I make a squishy that rises slowly like the shop ones?
Not really. Slow-rising feel comes from specific foam and manufacturing that you cannot copy at home. If that is what you are after, have a look at our slow rising squishies page.
Our selection
firm, slow rebound
mushykinz
MushyKinz Jelleez firm squishy
Mochi
Listed size
8 cm
Annoncé as a firm maltose squish with a slow rebound and a handful-sized character shape. Useful as a texture target.
See pros and consWhat works
Palm-sized, easy to copy
Annoncé slow rebound
Collectable characters
What doesn’t
Styles vary
Not a craft material
Good for Anyone who wants a reference for a dense, slow-rebound feel.